


 13 min read
 Jul 23, 2025
Prerequisites:
Before you start this tutorial, make sure you have:
- A basic understanding of NextJS or React
We are going to use the following technologies to create our blog:
- NextJS (v 13+) with the App Router
- MDX
- TypeScript
- The package next-mdx-remote

To begin, have your NextJS website ready.
What is MDX?
To understand what MDX is and why it's amazing for blogs, it's helpful to first understand what is Markdown/MD.
Markdown is a lightweight text formatting language that allows you to write content using simple symbols and plain text. This text is then converted into HTML. Essentially you are writing formatted HTML without having to individually write every H1 and p tag. You can imagine how annoying it would be to write a blog that way in a plain HTML file.
Example of Markdown:
When you write
I **love** using [Next.js](https://nextjs.org/)
It is outputted as:
<p>I <strong>love</strong> using <a href="https://nextjs.org/">Next.js</a></p>
Check out this cheat sheet for Markdown syntax.
Markdown was actually created in 2004, and it quickly became used by bloggers and tech enthusiasts. Before Markdown, writing for the web was difficult and cumbersome. Today Markdown is widely used in articles, content writing, and technical documentation. Also, you may have noticed that README files are typically written in Markdown.
MDX
MDX is a more powerful version of Markdown. The only difference between MDX and Markdown is that MDX allows you to write JSX in your Markdown files. This is useful for adding custom components or interactive content to your blog. For example in my blog I have a custom sidenote component.
MDX is the go-to option for creating blogs and text content on the web.
Why use MDX?
Markup-based languages offer freedom and versatility that other solutions don't. It gives you full control over your content, you are not controlled by third party platforms or databases. You don't have to log in anywhere, you just open the file and write! Your writing is truly portable, easy to back up, and can be moved or published anywhere you choose. And the best part, it's completely free!
Frontmatter
With Frontmatter you can add additional information/metadata about your post. It is YAML formatted. Frontmatter is placed at the top of your file, and it looks like this.
--- title: "The easiest way to build a blog in NextJs - How I built my blog" type: "Tutorial" time: "15 min read" tags: - blog - NextJS - webdev - MDX level: "Intermediate" published: "December 4, 2024 7:06 PM" --- ### Regular MDX: Add regular mdx...
As you can see I add things like the title, tags, published date... But your metadata can be anything you want it to be!
Workflow
I write and edit my posts straight in VSCode and commit the changes as code. It's a simple and convenient method, but the writing experience is nothing like MS Word or Google Docs. To improve the writing experience in VSCode I like to use the LTeX+ grammar spell checker extension. It adds nice squiggly lines below misspelled text and suggests other fixes just like in Word.
Getting started
Install dependencies
The only dependency you will need to install is next-mdx-remote.
npm install next-mdx-remote
With this package we can fetch our MDX blog posts from an external source. In our blog we will include all of our posts in a single folder and display them all on our website.
Another option to work with MDX which I considered is Contentlayer. I didn't go with it since the package is no longer being maintained and next-mdx-remote felt like an easier and more straightforward option to get started with.
Folder structure
In my blog I've structured my files like this:
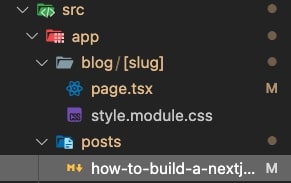
The page where we display individual posts lives inside a blog folder. The route of our post page is: blog/[slug]/page.tsx. Inside the blog folder we create a dynamic route by wrapping the [slug] folder in square brackets.
The blog post files live inside a posts folder. What's cool with using next-mdx-remote is that all we have to do to add a new post is to simply create a new MDX file inside this folder. Then the post will be visible on our page and ready to view! Creating posts and getting them to work doesn't require any additional steps which is nice!
Go ahead and replicate the above folder structure.
Create your first post
Create an MDX file in the posts folder. It can have any name you like. For example mypost.mdx.
Here is an example of what you can include inside:
--- title: "My post" --- # Hello world! This is my blog post I **love** using [Next.js](https://nextjs.org/)
Post page
Inside our post page (blog/[slug]/page.tsx)
Create a basic async function:
export default async function Post() { return <div>Post</div>; }
Then we need to import the following packages at the top.
import { compileMDX } from "next-mdx-remote/rsc"; import { promises as fs } from "fs"; import path from "path";
The compileMDX function converts the MDX content into React components and extracts the Frontmatter metadata. The fs and path imports allow us to read the post files from our local directory.
We need to get the dynamic page parameters. Update the async function to get the params:
export default async function Post({ params }: { params: { slug: string }}) {
Next we need to be able to display the correct post according to the parameter. Inside our post function add this:
const content = await fs.readFile( path.join(process.cwd(), "src/app/posts", `${params.slug}.mdx`), "utf-8", );
In this code we basically read and get the MDX content of the file which corresponds with our dynamic route param. Make sure the file path is exactly the same as where your posts are located.
Lastly we need to parse the Frontmatter and MDX content. Under our previously added line add the following:
interface Frontmatter { title: string; } const data = await compileMDX<Frontmatter>({ source: content, options: { parseFrontmatter: true }, components: { // Your custom components go here } })
At the top we define our TypeScript types for the Frontmatter (Be sure to update the Frontmatter types if you have more Frontmatter data you want to display).
We use the compileMDX function and inside the options object we basically tell compileMDX to look for and extract our Frontmatter. In components we can add our custom components, which is one of the main use cases of using MDX. For example in my blog the link and code blocks are custom components which are added there.
Finally, we can display the MDX content on our page. Write this inside the return:
<div>{data.content}</div>
Now open your post in the browser. For example the path could be this: http://localhost:3000/blog/mypost. You should have your text appear on the page!
If you get errors when viewing your post make sure all your paths are correct!
You can access your Frontmatter data by writing:
<h1>{data.frontmatter.title}</h1>
Listing every post from our local folder
Next let's display all our posts so that we have some interface where we can click and open a post. We will be using our Frontmatter title for the link text.
Let's create all this in another page. I'm using the home page of my website.
Import the same dependencies as we did on our post page together with the Nextjs Link component:
import { compileMDX } from "next-mdx-remote/rsc"; import { promises as fs } from "fs"; import path from "path"; import Link from "next/link";
We need to be able to read all our posts from our local directory. Make your functional component an async function and add this inside of it:
const filenames = await fs.readdir(path.join(process.cwd(), "src/app/posts"));
This gets an array of all our post filenames from the posts folder. Make sure your path is correct. Getting the filenames in its own step will make it faster to read every post in the next step.
With this list of filenames we need to get the Frontmatter data of each post and save them in a new list. Add this under the previous line:
interface Frontmatter { title: string; } // map through all our posts const posts = await Promise.all(filenames.map(async (filename) => { // get the MDX content of each post const content = await fs.readFile(path.join(process.cwd(), 'src/app/posts', filename), 'utf-8'); // extract Frontmatter metadata from the MDX content const { frontmatter } = await compileMDX<Frontmatter>({ source: content, options: { parseFrontmatter: true } }) // return the filename and Frontmatter return { filename, slug: filename.replace('.mdx', ''), ...frontmatter } }))
In the above code we first get the raw text content of each post. After that we perform the same compileMDX function on the content as before. This time we only need the Frontmatter as defined by the curly braces around Frontmatter. Then we return the Frontmatter along with the filename without the .MDX extension for our link destination.
Then finally we display the list on our page. Make each post a link which points to the slug of that post.
<ul> {posts.map(({ title, slug }) => { return ( <li key={slug}> <Link href={`/blog/${slug}`}>{title}</Link> </li> ); })} </ul>
And that's it! You can now click on the posts to open and read them.
Styling
Now is a good moment to make our post look a little more readable and styled. The text looks very busy and hard to read at the moment. Styling and formatting long text content is a must for readability. I will go over a few options to style the MDX. They are the following:
- Tailwindcss/CSS libraries
- Custom CSS
Each have their own pros and cons.
Tailwind
Tailwind offers a typography plugin which provides default styling for HTML you don't control — like Markdown. It's probably the quickest and easiest way to style Markdown. After you have the plugin installed and set up, you literally just give the prose class to the parent div of your content, and then the text will be all nicely styled and formatted. Tailwind allows you to also add further customization to headings, lists, links, etc... It will also handle dark mode for you.
The downside of the plugin is of course that you don't have the same control over your styling as with custom CSS. Also, if you choose this option you have to use Tailwind for your styling across your whole website, which might be something you do or do not want.
Vanilla CSS
The advantage of writing your CSS by hand is that you have full control over the look of your website.
The disadvantage is that this method takes more time and effort.
You can get started with nice CSS styles by using the styles in this GitHub repo. Alternatively ask ChatGPT to generate some CSS for your post.
I like to style my webpage with CSS modules.
Adding custom components
For example, you might want to add a custom <Aside> component for sidenotes. To do this create the component aside.tsx.
Here is what my aside component looks like:
import Image from "next/image"; import style from "./aside.module.css"; export default function Aside({ children }: { children?: React.ReactNode }) { return ( <aside className={style.aside}> <Image src="/info_icon.svg" alt="info_icon" width={40} height={40} className={style.aside_img} /> {children} </aside> ); }
I'm passing the children as a prop. This represents the content we pass in the opening and closing tag of our component (you will see this in just a moment). We pass the children inside the aside tag.
Import the aside component in our post page and add it to the components object of our CompileMDX function.
const data = (await compileMDX) < Frontmatter > { source: content, options: { parseFrontmatter: true, }, components: { Aside, }, };
To use our custom sidenote component we add this to our MDX:
<Aside>This is my sidenote.</Aside>
End
Thanks for reading!
To recap: we learned what MDX and Frontmatter is and why they are useful in blog writing. Then we developed our post page and home page where we could view all of our posts. Then we went further and styled our post to make it more readable. We also added custom components inside our post to take full power of MDX.
If you have any questions or feedback, feel free to reach out through my contact form! I’d love to hear your thoughts!
If you found this tutorial helpful, please share it with others who might benefit.